Get the Flash Off of the Camera

Yesterday afternoon, I was walking along The Bluff near my home. The Bluff is a half-mile stretch of narrow street that runs along The Intercoastal Waterway with the water and docks on one side and homes on the other – old oaks with moss create a mystical canopy over the road, one of the most beautiful settings in Savannah. Now that you get the picture, a photographer was taking informal portraits of a couple before their prom – with an on-camera, pop-up flash for fill.

Unfortunately, on-camera flash of people frequently results in a “deer in the headlights” look – not the most appealing. There are exceptions to this including the use of a ring light for fill or using an on-camera speed-light bounced off of a reflecting surface such as a wall. Taking great outdoors photos of people requires finesse. The camera is first set with ISO, speed, and aperture  for the background and surroundings, best done in manual mode. Frequently, bokeh is used to bring attention to the main subject. Bokeh is the aesthetic quality of blur produced in the out-of-focus parts of an image. See my post on January 4, 2016 for an explanation of High-speed Sync Flash. This photo seen in my post is a good example of bokeh.

 Portrait of a Beautiful Lady


Portrait of a Beautiful Lady

Lets assume the camera is set for the background – frequently underexposed, again to help bring attention to the main subject(s). The classic position for the main light is 45 degrees to one side or the other and 45 degrees angled down on the subject. This results in the classic Rembrandt look with the shadow of the nose not quite touching the upper lip. Additional lights may be used for fill or to separate the subject from the background. Various reflectors may be used in addition to or in place of strobes. My favorite main light source when photographing people is to bounce a Profoto head (D1 or B1) into a silver 42″ umbrella and back through a 7′ diffusing umbrella. This set-up can be challenging if there is any wind. This is an example of a recent headshot using only this set-up on a black backdrop.

Mom-001


Copyright Dan Biggerstaff Photography. All rights reserved © 2016


A GIFT

Occasionally, I see a potential photograph that I consider to be a gift – something where the elements of color, light and gesture all seem to come together, almost magically. I said a potential photograph because to turn it into reality you have to at least have a camera.

Recently, The Thirty Fifth Annual Telfair Ball was held here in Savannah. There was a light check the night before the ball to which I accompanied my wife; she was The Chair of the event. Even though she would prefer me not to, I must give especially her, all the other volunteers, and the staff at the museum kudos for all of the hard work she devoted to the ball, and the resulting success.  Equipped with with my camera (Nikon D800) and tripod and a 24-70mm, f2.8 lens, I was not sure what I would see at the light check. As we were walking towards the Jepson Center (where dinner would be served), this (potential) photo is what came into view. The ladder on the left was used to adjust the projection above the entrance to The Art Center. Life-sized styrofoam and plywood silhouettes of musicians were constructed to promote the theme of the event. The light, color, and gesture  were all enhanced by the street light outside the museum. The only thing missing at that moment was the music. The particulars include ISO 200, 24 mm, f5.0, and 1/8 sec. The self-timer on the camera was used to minimize shake.

Ball-001


Part 2: The morning after the ball, we were driving by the museums and saw that the silhouetted musicians had been moved near the entrance of the Jepson to be soon disassembled for storage. We drove home to get my camera and to the office to get the lighting equipment. By now it is 11 AM, with the museum opening at noon – short on time. There is plenty of natural light coming through the floor-to-ceiling windows of the Jepson, but I wanted to create a feeling of night time to go along with the theme. The single light source was a Profoto B1 monolight with a magnum reflector and medium-blue gel. The camera is handheld at ISO 200, 45mm, f10.0, and 1/320 sec.

Ball-002

After repositioning the silhouettes on the stairway leading to the second floor, this was the final shot using the same settings.

Ball-003


Copyright Dan Biggerstaff Photography. All rights reserved © 2015

Stained-Glass Photography

Barts Heart Centre is a brand-new, state-of-the-art health-care-facility at St. Bartholomew’s Hospital in London. Savannah-based stained-glass artist, Erica Rollings (www.ericarollings.net), was asked to create a piece for the new hospital. Three months work resulted in an amazing stained-glass masterpiece of an anatomically-correct human heart, and it is almost 3 feet square. The piece is actually two stained-glass windows sandwiched together to show both an internal anatomy and that of the coronary arteries on the outside of the heart.

Prior to being packaged for shipment, Erica asked me to photograph the window. Most of us have taken photos of stained glass in cathedrals and other public locations “in-situ.” Photographing the art piece “in-the-raw” provides a unique opportunity to minimize distortion. The first consideration is to make sure the plane of the film or sensor (in the case of digital photography) is parallel to to window – and at the same time the center of the lens should be at the same height as the center of the of the window. If the format of the camera does not exactly match that of the window, in-camera cropping should allow enough space around the piece for post-production cropping. The final consideration is the lighting. Front lighting causes the window to lose texture and flattens the colors. The best choice is back lighting, either actual or artificial sunlight – at an angle that mimics the real thing. Side lighting can bring out the lead “came” or strips of lead used to join the pieces of glass. This photograph was taken in the artist’s backyard using backlit sunlight. The particulars include Nikon D800, ISO 100, Nikon 70-200 mm f2.8 lens at 160 mm, f11, 1/80th sec.

heart-001


Copyright Dan Biggerstaff Photography. All rights reserved © 2015

HIGH-SPEED SYNC FLASH

 Portrait of a Beautiful Lady


Portrait of a Beautiful Lady

For a moment, back to basics. The amount of light that reaches the sensor in DSLR’s (digital single lens reflex cameras) is controlled by the ISO, f-stop, and shutter speed. Most DSLR’s have a maximum sync shutter speed of 1/250th of a second – that is the fastest shutter speed to be able to take a photograph using flash. Some cameras allow the shutter speed to be set at higher speeds using HSS (high-speed sync), which can freeze action in the background, reduce the brightness of the background, and/or enable the photographer to use lower f-stops to blur the background. (For the purpose of this discussion, I am assuming both the camera and flash are set on manual mode, not automatic or TTL –  TTL is a mode some flashes have that allow the flash to automatically control the light output of the unit. Also, when changing the shutter speed or f-stop, let’s assume the other remains unchanged.)

For HSS photography, the other component needed is a HSS-capable flash, whether it be a speed light or studio-style strobe. Both Nikon and Canon have speed lights that can be used with HSS, and Profoto makes studio strobes which can be used for HSS when more light is needed for the photo. This is not a complete list of all brands that provide these products. For a more technical explanation of HSS, go to http://neilvn.com/tangents/high-speed-flash-sync/.

More basics. When using flash, the f-stop controls the brightness of the subject lit by the flash (with a given light output), and the shutter speed controls the brightness of the background. Because of the inverse-square law (light falls off quickly), flash will have little or no effect on the brightness of the background unless the background is very close to the subject being lit by the flash.

The photograph above was taken in open shade on a bright sunny afternoon. I put the subject in open shade so she would not squint, dropped the f-stop to blur the background, and increased the shutter speed to darken the background. A beauty dish and a Profoto B1 strobe was used to light the subject. The camera settings were ISO 200, f-stop 6.3, and a shutter speed of 1/1600th of a second. I was using a Nikon D800 with a 70-200mm lens at 200mm. At a given ISO (and same shutter speed), decreasing the f-stop (say to f2.8) would have caused the background to blur even more and would have required less output from the flash. If the f-stop was increased to f16.0, the background would have been more distinct, and more power output from the flash would have been required to light the subject. If the shutter speed (with a stable f-stop) was decreased to 1/250th of a second, the background would have been blown out (way over-exposed). Increasing the shutter speed to 1/6000th of a second would have made the background considerably darker.

Copyright Dan Biggerstaff Photography. All rights reserved © 2015

Low Light Photography

Telfair-001

Low light photography does not always require flash. This photo was taken as part of a series documenting Christmas decor at The Telfair Museum of Art here in Savannah. TAG (Telfair Academy Guild) supports the museum with fund-raising events along with other functions such as decorating for the holidays.

This photo depicts faux bread just after it was taken out of an old brick oven. The limited lighting in the room was provided by LED spots. I chose to use available light with my camera on a tripod and shot at ISO 200 at f7.1 at 1/2 sec. A flash with a CTO gel was used to give the appearance of  a fire in the oven.

All photos copyright Dan Biggerstaff Photography. All rights reserved © 2014

SHARP FOCUS

blog-001-2

It is not that long ago that manual focus was standard on all cameras. Today’s cameras have an auto focus function that is usually more accurate than manual focus. Focusing either manually or with autofocus can get tricky when you are in low light situations – like I recently was Halloween night.

A couple of tips make focusing in low light easier and more precise. First, it may take the camera a little longer than normal to focus in low light situations. Looking through the viewfinder, you may see the subject go out of focus before it comes back in focus. With my Nikon D800, this takes less than a second. If you were to push the shutter before sharp focus occurs, a blurry photo is the result. Secondly, use the fastest lens you can. I was using a 24-70 mm zoom with an f-stop of 2.8. My 28-300 mm lens has a variable f-stop from 3.5 at 28 mm to 5.6 at 300 mm. This lens will not focus as well in low light conditions as the f 2.8 lens.

A Profoto B1 monolight with a beauty dish was my primary light source. Once it got dark, I had to rely on the autofocus in my camera – in many cases I could not see well enough to manually focus the lens. An alternative would have been to use a continuous video light to make focusing easier (even shining a flashlight on the subject would work).

These are a few of the photos taken Halloween. The photo at the beginning of this blog was the very dramatic and depicts the Halloween mood well.  The last photo in group 3 shows great expression – “it is time for a meltdown.” The best way to view the photos is to click on an icon and advance with the arrow key. The NexGen Gallery only holds 20 photos, so you have to back out and click on the next group.

Any Trick or Treaters who did not receive their photo by email should send an email to me at info@danbiggerstaff.com to remedy the situation. Enjoy!

All photos copyright Dan Biggerstaff Photography. All rights reserved © 2014

TRAVEL PHOTOGRAPHY – SCOTLAND

Castle-001

Travel photos can be easy or a challenge. My wife and I were fortunate to recently go to northern Scotland, a destination to which we had not previously traveled. In writing this blog, my initial plan was to describe history and details about the locations, etc. Since this is a photography blog, I thought this would be BORING.  This is an abbreviated account of the trip. By the way, over time I will be printing and framing select photos from the trip to hang in my office and make available for sale. Come by and take a look.

The first few shots were street scenes in Inverness where the trip began. The River Ness can be seen in several. The river is connected with a series of locks to the Loch Ness, the home of the famed Monster. Just for fun, I took a double exposure (in the camera, not manipulated in Photoshop) of ornamental branches decorated with holiday lights superimposed over bottles of scotch whisky on glass shelves; the location was a restaurant where we had lunch. The best way to see the photos is to click on the first and use the “right arrow” to view at your own pace. If a gallery contains more than 20 photos, close the last photo and go to the next section in the gallery – a little bit of trouble but worth the effort.

The Lord of the Glens, a small passenger ship was our home for the next part of the journey. At the end of Loch Ness, our next overnight stop was in Fort Augustus. Then, we sailed through Loch Lochy, south of Loch Ness, before going into the North Sea with stops in the Inner Hebrides, islands off of the northwest coast of Scotland. The photos show the scenery as we passed, as well as other passengers and crew on board the ship, and a few local animals. We docked every night affording opportunities to see local attractions. Some destinations did not have facilities to dock, in which cases we rode local ferries.

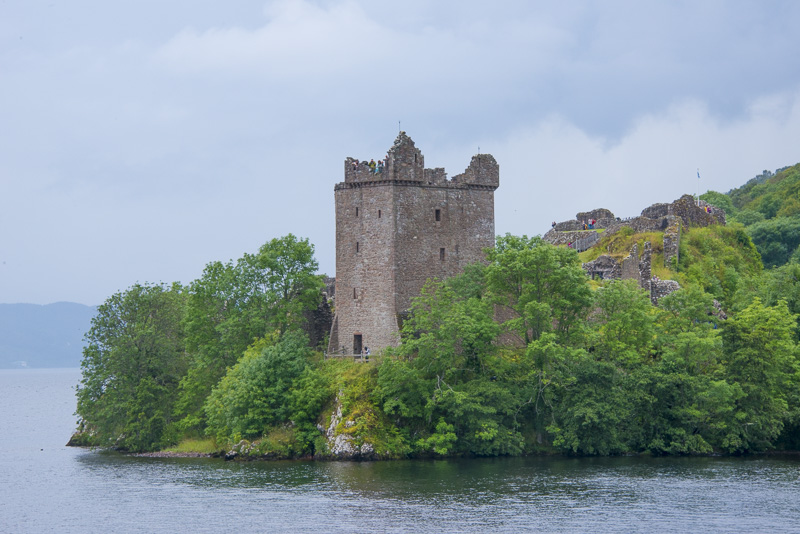
Comments about a few of the photos: One photo is taken from the interior of the ship looking out into Loch Ness. The next is of Castle Urquhart, a favorite spot for Nessie sightings. One of the crew celebrated his birthday during the trip and got kisses from two of his attractive crew-mates. At one of the many castles we saw, a group of children were playing, and I could not resist a photo of this darling. The photo of a man cutting the grass is boring except for the fact that he had on a tie. Pictures of food (this of a delicious dessert on board ship) can always add interest to documentation of travel. I had to include a photo of a scotch whisky distillery in Scotland. A couple of things about scotch – the first is that it is called whisky and not scotch in the British Isles. The second is that it is enjoyed with just a wee bit of distilled water added and not over ice.

Comments about travel photography: it is hard to travel with and use off-camera lighting such as big studio strobes, and photos taken with popup flash usually look like a flash picture – not desirable. The best alternative is to use available light which means having a camera with a high speed sensor (I shot some photos at ISO 6400) and/or having a light-weight tripod. Another concern when doing travel photography is what lenses to bring. On a trip a few years ago, my photo backpack weighed 45 pounds – I will never do that again. A mentor of mine, Jay Maisel, famously states “the more lenses you have, the fewer pictures you will take.” On this trip, I had a 27-300 mm f3.5-5.6 lens and a 45 mm f2.8 tilt-shift lens. I used the second lens very little.

Back to comments about photos: some photos should document location. The Old Forge Inn in Inverie is the remotest pub and restaurant on the British mainland. Marshall and a number of other passengers (including me) on the ship enjoyed the refreshments and comradery the inn had to offer. The only way to and from the location is by boat or a 16 mile hike from Kinlochourn. The only photo in this series I did not take was one of me and my wife when I asked a passerby to take the photo. On the next leg of the trip, a Viking Longboat from Denmark crossed our bow.  Then, the trip onboard the ship was celebrated with a farewell dinner. We were served haggis; the rest of the meal was delicious. If you are not familiar with haggis, it is a combination of sheep’s heart, liver, and lungs with onion, oatmeal, and a few other ingredients that is encased into the stomach and cooked for several hours. The photo with the knife shows it being sliced in a celebratory fashion to serve at our dinner.

A photo taken in a restaurant in Edinburgh shows the beginning of the last leg of the trip. There are a number of photos of the famed Edinburgh Castle, both from a distance and on the castle grounds. The Edinburgh Military Tattoo is an annual celebration of music and entertainment that brings together thousands of people from all over the world with no lack of pomp and ceremony. It concludes with a phenomenal fireworks display. The remaining photos were taken in Edinburgh, including the one of the bow of The Royal Yacht Britannia, shot through a “porthole.” Enjoy!

All photos copyright  Dan Biggerstaff Photography. All rights reserved © 2014

MOTIVATING THE PRACTICAL

Making the lighting of a subject look like it is coming from lights in the scene is a phrase used in the film industry and is called “motivating the practical.” Another form of lighting is to create a desired effect just for the sake of lighting the subject in a certain way. The worst type of lighting for photographs is on-camera flash which gives the classic “deer in the headlights” look. If you are using electronic flash, get the source off of the camera.

I recently attended a photography workshop conducted by Gregory Heisler. An on-line search of Mr. Heisler will result in numerous links, well worth your time for those interested in portrait photography. His work is amazing! Purchasing a copy of his book, 50 Portraits, is a small investment for the wealth of information you will receive. In addition to the amazing photographs, he provides interesting personal information about his famous subjects and thoughts on technique in each photo.

Greg was the one who introduced the phrase “motivating the practical” to me. Other concepts he promotes in photography include trying not to take the same photograph twice, whether it is one of his own or one that he has seen before. In fact, the only photographs he has on the walls of his studio and home are those of his girls. Once he has taken a photograph, he moves on to something else. When taking a photograph, he frequently frames the picture in the camera and then composes the content.

The light source(s) for a photograph can be divided into continuous and flash. Each has its advantages and disadvantages. The scope of this blog does not allow a detailed discussion of lighting, but continuous light sources allow you to see what you are getting. On the other hand, flash may emit a stronger light and is able to freeze motion. You may have to click on View Images at the bottom of the page to see these photos.

This photograph was taken using a tungsten bulb in an inexpensive reflector ($7.95) placed on the old-fashioned stove in front of the model. Our assignment was to photograph our model as an artist, musician, or writer. With my passion for cooking, the model was portrayed as a chef for a magazine cover.

Chef-001


The lighting for this scene was ambient light coming through the door behind the model, along with a two-bulb fluorescent fixture purchased a local home-supply store. The vertical fluorescent bulbs were on a stand to the left of the model.

Bedtime-001


Rules are meant to be broken, so I did in this photo. The location for the shoot was a deserted power plant. The subject in this photo was a friend of a model who was on location at the shoot. I asked if she would mind being photographed, and she graciously agreed. At this point, my group was having technical difficulties with our studio flash, so I put the SB910 flash on my camera with a modifier called a RoundFlash. The RoundFlash effectively converts an on-camera flash to a ring light. This light is best used as a fill light, but I chose to use it as the primary light source in this photo.

Power Plant-001


The last photo was taken on the second floor of a federal penitentiary that was closed many years ago. A gelled-studio strobe was on the first floor angled up to create the shadow of the bars and of the model on the ceiling. The camera was hand-held, and two images were made on the same frame in the camera. I envisioned this image on the cover of a CD album for a rock star. This “look” is not something I typically shoot but was just having fun.

Prison-001

All photos copyright  Dan Biggerstaff Photography. All rights reserved © 2014

Lighting for HeadShots

Talk with a hundred photographers, and you will get a hundred different recommendations how best to light the same subject.  My current go-to setup for lighting head shots is a studio light (Bogen 15000 – yes it is ancient but still works) shot into a 45″ silver umbrella. The light comes back through a 7′ diffusing umbrella before it hits the subject. A 7 foot umbrella is big and bulky but gives a soft light with a nice catch light for the eyes. My studio has a 10 foot ceiling, so the umbrella is off of the floor by a couple of feet. I usually stand in front of the umbrella when shooting head shots, which can be seen if you look carefully at the catch lights.  Currently, I am using two Nikon SB 910’s  to light the white backdrop.

Peter Hurley, the instructor for the head shot workshop I just finished, uses Kino Flo’s which are four bulb fluorescent continuous lights on the subject and Porfoto strobes on the background. Westcott just came out with a continuous LED daylight balanced light source which sounds like a good alternative to using strobe. I will keep you posted on my preferred lighting as time goes on. These are several examples of recent head shots.

Headshots-001 Headshots-002 Headshots-003