THE IMPORTANCE OF PROJECTS

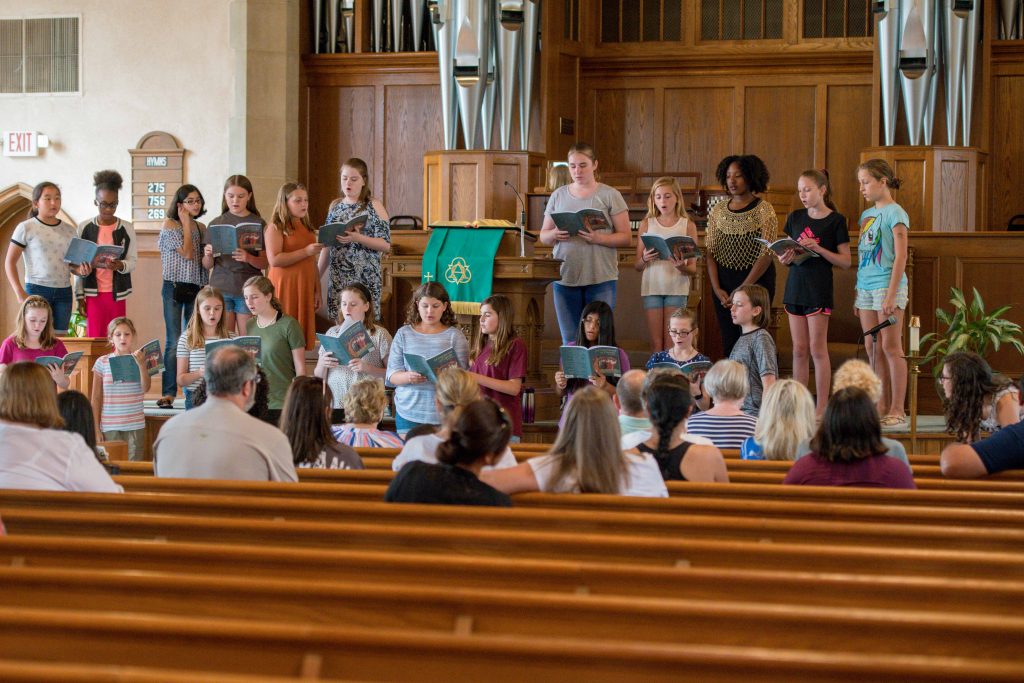
All skills require practice to maintain proficiency and improve expertise. Photography is no exception. Whether it is a personal project or one that has been assigned for commercial work, these promote skill. Below is a brief story about a personal project that began 2 1/2 years ago, and one that I hope will continue for many years. The photograph was taken the young ladies sang after only 2 rehearsals for their parents attending an orientation meeting – amazing young women, with amazing talent. I cannot wait to see and hear them throughout the coming year. 

RISE Chorales (www.risechorales.com) began with its first rehearsal on March 21, 2016 under the leadership of Emmy Williams Burch, with the assistance of Cuffy Sullivan. The young women’s choral group was formed to promote excellence in singing, in addition to providing an opportunity for socializing and community service. The first time I photographed Emmy was several years earlier when she was the Conductor of The Savannah Children’s Choir. During the first rehearsal attended, I was almost brought to tears watching Emmy working with the children, her energy and vibrancy, her care and compassion, and always her excellence in teaching and conducting. RISE has grown since the early days and has found a home at First Presbyterian Church where they rehearse, perform during services, and offer concerts several times a year.

The majority of my photography of the group is with ambient light, except twice a year when I do headshots of the young ladies with the addition of studio lighting. The available light in the sanctuary is not bright, an understatement. I typically use ISO settings of 1600-3200 and am using f-stops between 1.4 and 3.5. Most of the photos are shot hand-held.

To view, and purchase if desired, all photos from RISE Chorales, go to www.danbiggerstaff.zenfolio.com and click on Client Galleries, and then RISE Chorales. Select the year you would like to view and ENJOY!

Copyright Dan Biggerstaff Photography. All Rights Reserved © 2018

HEADSHOT VS. SNAPSHOT


headshot-007

I have had recent requests for headshots from clients not understanding what a headshot really is and what goes into creating a good headshot. Their thoughts were they would “stop by” and get what they wanted in 5 minutes. A snapshot can be taken in less than 5 minutes but not a good headshot.

A headshot should say something about who the person is and should be something they can use, proudly, for years to come. The technical aspects of the photograph include the lighting, the camera, and the background. Lighting can be ambient but is more easily controlled with flash, either off-camera speedlight or studio flash, both used with modifiers to control the quality and spread of the light. Today’s high-resolution DSLR cameras provide the ability to capture exquisite photos that may be used on social media or blown up for larger portraits. In a good headshot, you can see individual eyelashes – almost scary, but in a way, elegant. Most headshots are taken in color and can be easily converted to black and white if preferred. The background in most headshots should be “neutral” and not pull the eye away from the face. The most frequently used backgrounds in headshots are white or black backdrops, although any solid color may be chosen. Natural backgrounds may be chosen and can range from almost any wall or structure to landscapes. Lens-choice and setting on the camera can allow complete blurring of the background to eliminate distractions from the face – this is called bokeh.

Subject preparation is of utmost importance and includes clothing and accessory choices in addition to hair and makeup. Frequently during a headshot session, she (or he) will do one or two wardrobe changes. It is best to stay away from bold patterns which would take the onlooker’s eye away from the face to the clothing itself. The same thing applies to jewelry which should be subtle or not worn at all – bright areas in the photograph pull the eye away from the face. Ideally, hair and makeup will be done by a professional who is aware of the nuances that look good in a photo. For instance, blemishes should not be caked with makeup but can easily be eliminated in post-production editing.

The headshot photo session in my hands usually takes an hour or so, sometimes less and sometimes more. This allows time for wardrobe, lighting, and background change – sometimes there will be makeup touchup. Ideally a stylist will be present during the shoot to make any adjustments that are needed. With all of the components completed, the actual shoot begins. Most people do not like having their photo taken, but with a professional photo shoot love the results. After the shoot is over, I would guess that 90-95% of my clients say the shoot was fun. It usually takes a few minutes to relax in front of the camera, although some get great photos early in the process. Very subtle changes in expression and head and shoulder position are directed by the photographer that result in the desired look.

Post shoot editing typically takes a couple of hours. After this the photos are ready for viewing and use/printing. Now that you know what is involved in getting a great headshot, the obvious question is cost. A friend of mine in NYC who is nationally known gets $2,000 per session, in addition to the fee for hair and makeup on location. Savannah is not NYC and the fees charged by the pros are usually $350-$700. With SCAD in town, you can find headshots for less than this, but you get what you pay for.

Here are a few more headshots showing different lighting and backgrounds.


Copyright Dan Biggerstaff Photography. All Rights Reserved © 2018

Before and After

Sophia-001

This is a photo of a beautiful woman. One of my mentors, Jay Maisel (www.jaymaisel.com), states  the components of a great photograph are light, color, and gesture. I would add DETAIL to the components. Jay would probably comment that detail goes without saying. I am certainly not going to argue with him but will make several points.

Do as much as you can in the camera, cropping, exposure, bokeh, etc. When photographing people, good hairstyling and makeup before the shoot make post-editing a lot easier. Unfortunately, the time for or availability of a hairstylist and makeup artist is not always there. That is where post-shoot editing comes into play. I use Lightroom® and Photoshop® but admit my skills with the latter are limited. The “automatic” software for editing portraits usually gives a Barbie Doll® look that is not my preference.

I have chosen to seek out someone with the knowledge and experience I do not have for editing. Peter Bergeron (petertbergeron@gmail.com) has the skills and talent to meet my needs for “serious” editing. Peter has a Master’s Degree from SCAD and has been editing and printing photos for many years. The following are BEFORE and AFTER closeups of the above photo, thanks to Peter.

BeforeAfter


Copyright Dan Biggerstaff Photography. All rights reserved © 2016


Get the Flash Off of the Camera

Yesterday afternoon, I was walking along The Bluff near my home. The Bluff is a half-mile stretch of narrow street that runs along The Intercoastal Waterway with the water and docks on one side and homes on the other – old oaks with moss create a mystical canopy over the road, one of the most beautiful settings in Savannah. Now that you get the picture, a photographer was taking informal portraits of a couple before their prom – with an on-camera, pop-up flash for fill.

Unfortunately, on-camera flash of people frequently results in a “deer in the headlights” look – not the most appealing. There are exceptions to this including the use of a ring light for fill or using an on-camera speed-light bounced off of a reflecting surface such as a wall. Taking great outdoors photos of people requires finesse. The camera is first set with ISO, speed, and aperture  for the background and surroundings, best done in manual mode. Frequently, bokeh is used to bring attention to the main subject. Bokeh is the aesthetic quality of blur produced in the out-of-focus parts of an image. See my post on January 4, 2016 for an explanation of High-speed Sync Flash. This photo seen in my post is a good example of bokeh.

 Portrait of a Beautiful Lady


Portrait of a Beautiful Lady

Lets assume the camera is set for the background – frequently underexposed, again to help bring attention to the main subject(s). The classic position for the main light is 45 degrees to one side or the other and 45 degrees angled down on the subject. This results in the classic Rembrandt look with the shadow of the nose not quite touching the upper lip. Additional lights may be used for fill or to separate the subject from the background. Various reflectors may be used in addition to or in place of strobes. My favorite main light source when photographing people is to bounce a Profoto head (D1 or B1) into a silver 42″ umbrella and back through a 7′ diffusing umbrella. This set-up can be challenging if there is any wind. This is an example of a recent headshot using only this set-up on a black backdrop.

Mom-001


Copyright Dan Biggerstaff Photography. All rights reserved © 2016


CONTINUING EDUCATION

Many photographs since my last post. Looking back over the past year, I was fortunate to be able to photograph a number of subjects ranging from portraits and an opera to weddings, family get-togethers, concerts, and a museum exhibition. As with any skill, doing something regularly improves quality as does working with others in the same field, along with continuing education. In my other profession, gynecology, I always learn when working with other physicians in the operating room. The same thing applies to photography. A few times a year I try to attend photography workshops, forums and meetings.

My first workshop last year was in California with a world-renown portrait photographer, Greg Gorman, who is known for his celebrity photography. We spent the week photographing two models along the dramatic backdrop of the Northern California Coast. I must say the food and wine in the evenings was a great way to end the long days – Greg has his own personal chef, owns his own winery. There were 10 photographers attending the workshop with skill levels from advanced amateur to professional. We were divided into two teams of five photographers, to assist each other with lighting and setup. My wife and I were in a team with a husband, wife and daughter. The husband was Thomas Knoll; for those of you not familiar with Thomas, he wrote the original programs for Photoshop and Lightroom. He was very laid back, quiet, and fun to work with (as were his wife and step-daughter). As if that was not enough “celebrity among us,” Yaniv Gur was on the other team. Yaniv is the Senior Director of Engineering for Apple. A really fun and educational week! These are a few photographs of mine from the week. The first is of Thomas Knoll, then a few of the models, having fun at a winery, and finally an evening at Greg’s home.


The next workshop we attended was The D-65 Lightroom Workshop. It is put on by Seth Resnick and his wife, Jamie Spritzer. Seth was the second pro presenting at the portrait workshop with Greg Gorman in California. Although most photographers find Lightroom much easier to use than Photoshop, using Lightroom correctly requires more knowledge than meets the eye. Internationally-know portrait photographer, Gregory Heisler, calls the D-65 Workshop a must do. I humbly agree with Greg. There were a total of 9 photographers attending this workshop, one for the fourth time. I could see going back for a refresher in a few years. By the way, Seth is quite a wine connoisseur and knows his way around the kitchen. The next to last night night, he and Jamie presented an elegant, delicious, and decadent dinner – need I say more. This is a photo I took of Seth, along with one of the many dishes presented that evening.

Seth-002


Seth-001


Copyright Dan Biggerstaff Photography. All rights reserved © 2016

THE STORY

SCADFash-013

THE STORY BEHIND THE PHOTO(S).  Journalistic photography or photojournalism employs photos to tell a news story. I suggest that all photographs tell a story, many stories, or at least a moment in a story. Photographs can be taken in such a way to create a smooth, flowing narrative of a sequence of events, or in a way that is random and is a seemingly disjointed documentation of an event. For example, wedding photography is evolving from the random style to the story-telling style.

Back to this story. A patient, and long-time friend, gave me two tickets to The Annual SCAD Fashion Show. One of my favorite outfits of the afternoon caught my eye as we were approaching the entrance to event at The SCAD Museum. Once inside some of the attendees were captured through the lens of my camera – even their shoes.

And then the show began. Little did I know that my wife and I were sitting immediately in front of a very loud sub-woofer, which meant that we not only could hear the bass part of the music but could also feel the vibrations, for the next 20 minutes or so of the show! All of the wardrobes were both design and construction creations of the students, many simply amazing! Light, color, gesture, and texture all combined to contribute to the sensory overload generated by what we were seeing – and don’t forget the music, especially the bass. And then it was over, almost as quickly as it began. Outside, two attendees pose for a photo. That’s my story, at least a small part – to be continued.

Click on the individual thumbnails for larger views.

Copyright Dan Biggerstaff Photography. All rights reserved © 2015


PRINTS AND FRAMES

The majority of photographs taken today remain in the dark vaults of a hard drive, never to see the light of day. A relative few are posted in various places on the internet, most soon to be forgotten.  A privileged number end up on photographic paper, and even a lesser elite few are framed to be displayed on a wall or placed in a prominent place.  Such a waste!

My two jobs, medicine and photography, are distinct and separate but occasionally cross paths. Recently, I was chatting with a new gyn patient in my office, when all of a sudden she appeared to become upset. I asked what was wrong, and she stated that a photograph leaning against the wall in my office ready to be hung reminded her of her childhood in Jamaica. She wanted to know where I had taken the photo, and I responded in Viet Nam. She recounted that the primitive stove looked exactly like the one on which her mother cooked when my patient was a child. We both agreed that it was amazing that two distant and distinct cultures would use the same appliance. This teapot on a wood-burning stove caught my eye in a market in a remote part of Viet Nam.

teapot-001


Copyright Dan Biggerstaff Photography. All rights reserved © 2015

A GIFT

Occasionally, I see a potential photograph that I consider to be a gift – something where the elements of color, light and gesture all seem to come together, almost magically. I said a potential photograph because to turn it into reality you have to at least have a camera.

Recently, The Thirty Fifth Annual Telfair Ball was held here in Savannah. There was a light check the night before the ball to which I accompanied my wife; she was The Chair of the event. Even though she would prefer me not to, I must give especially her, all the other volunteers, and the staff at the museum kudos for all of the hard work she devoted to the ball, and the resulting success.  Equipped with with my camera (Nikon D800) and tripod and a 24-70mm, f2.8 lens, I was not sure what I would see at the light check. As we were walking towards the Jepson Center (where dinner would be served), this (potential) photo is what came into view. The ladder on the left was used to adjust the projection above the entrance to The Art Center. Life-sized styrofoam and plywood silhouettes of musicians were constructed to promote the theme of the event. The light, color, and gesture  were all enhanced by the street light outside the museum. The only thing missing at that moment was the music. The particulars include ISO 200, 24 mm, f5.0, and 1/8 sec. The self-timer on the camera was used to minimize shake.

Ball-001


Part 2: The morning after the ball, we were driving by the museums and saw that the silhouetted musicians had been moved near the entrance of the Jepson to be soon disassembled for storage. We drove home to get my camera and to the office to get the lighting equipment. By now it is 11 AM, with the museum opening at noon – short on time. There is plenty of natural light coming through the floor-to-ceiling windows of the Jepson, but I wanted to create a feeling of night time to go along with the theme. The single light source was a Profoto B1 monolight with a magnum reflector and medium-blue gel. The camera is handheld at ISO 200, 45mm, f10.0, and 1/320 sec.

Ball-002

After repositioning the silhouettes on the stairway leading to the second floor, this was the final shot using the same settings.

Ball-003


Copyright Dan Biggerstaff Photography. All rights reserved © 2015

Stained-Glass Photography

Barts Heart Centre is a brand-new, state-of-the-art health-care-facility at St. Bartholomew’s Hospital in London. Savannah-based stained-glass artist, Erica Rollings (www.ericarollings.net), was asked to create a piece for the new hospital. Three months work resulted in an amazing stained-glass masterpiece of an anatomically-correct human heart, and it is almost 3 feet square. The piece is actually two stained-glass windows sandwiched together to show both an internal anatomy and that of the coronary arteries on the outside of the heart.

Prior to being packaged for shipment, Erica asked me to photograph the window. Most of us have taken photos of stained glass in cathedrals and other public locations “in-situ.” Photographing the art piece “in-the-raw” provides a unique opportunity to minimize distortion. The first consideration is to make sure the plane of the film or sensor (in the case of digital photography) is parallel to to window – and at the same time the center of the lens should be at the same height as the center of the of the window. If the format of the camera does not exactly match that of the window, in-camera cropping should allow enough space around the piece for post-production cropping. The final consideration is the lighting. Front lighting causes the window to lose texture and flattens the colors. The best choice is back lighting, either actual or artificial sunlight – at an angle that mimics the real thing. Side lighting can bring out the lead “came” or strips of lead used to join the pieces of glass. This photograph was taken in the artist’s backyard using backlit sunlight. The particulars include Nikon D800, ISO 100, Nikon 70-200 mm f2.8 lens at 160 mm, f11, 1/80th sec.

heart-001


Copyright Dan Biggerstaff Photography. All rights reserved © 2015

HIGH-SPEED SYNC FLASH

 Portrait of a Beautiful Lady


Portrait of a Beautiful Lady

For a moment, back to basics. The amount of light that reaches the sensor in DSLR’s (digital single lens reflex cameras) is controlled by the ISO, f-stop, and shutter speed. Most DSLR’s have a maximum sync shutter speed of 1/250th of a second – that is the fastest shutter speed to be able to take a photograph using flash. Some cameras allow the shutter speed to be set at higher speeds using HSS (high-speed sync), which can freeze action in the background, reduce the brightness of the background, and/or enable the photographer to use lower f-stops to blur the background. (For the purpose of this discussion, I am assuming both the camera and flash are set on manual mode, not automatic or TTL –  TTL is a mode some flashes have that allow the flash to automatically control the light output of the unit. Also, when changing the shutter speed or f-stop, let’s assume the other remains unchanged.)

For HSS photography, the other component needed is a HSS-capable flash, whether it be a speed light or studio-style strobe. Both Nikon and Canon have speed lights that can be used with HSS, and Profoto makes studio strobes which can be used for HSS when more light is needed for the photo. This is not a complete list of all brands that provide these products. For a more technical explanation of HSS, go to http://neilvn.com/tangents/high-speed-flash-sync/.

More basics. When using flash, the f-stop controls the brightness of the subject lit by the flash (with a given light output), and the shutter speed controls the brightness of the background. Because of the inverse-square law (light falls off quickly), flash will have little or no effect on the brightness of the background unless the background is very close to the subject being lit by the flash.

The photograph above was taken in open shade on a bright sunny afternoon. I put the subject in open shade so she would not squint, dropped the f-stop to blur the background, and increased the shutter speed to darken the background. A beauty dish and a Profoto B1 strobe was used to light the subject. The camera settings were ISO 200, f-stop 6.3, and a shutter speed of 1/1600th of a second. I was using a Nikon D800 with a 70-200mm lens at 200mm. At a given ISO (and same shutter speed), decreasing the f-stop (say to f2.8) would have caused the background to blur even more and would have required less output from the flash. If the f-stop was increased to f16.0, the background would have been more distinct, and more power output from the flash would have been required to light the subject. If the shutter speed (with a stable f-stop) was decreased to 1/250th of a second, the background would have been blown out (way over-exposed). Increasing the shutter speed to 1/6000th of a second would have made the background considerably darker.

Copyright Dan Biggerstaff Photography. All rights reserved © 2015